A custom coffee sleeve looks like a simple band of board, but two decisions made before the file ever reaches a printer determine whether it fits the cup, prints cleanly, and lands on budget: the physical size you specify and the print method you choose for your quantity. Get either wrong and you are looking at a reprint, a sleeve that slides off a 20-ounce cup, or a bill that is double what it needed to be. This walkthrough covers how to specify a sleeve from dimensions through print-ready artwork so the first run is the one you keep.
Start with the cup, not the sleeve
Sleeves are sized to a range of cups, not a single cup, so the first question is which drinks the sleeve has to cover. A common corrugated kraft sleeve runs about 2.5 inches tall with a top opening near 5 inches and a bottom near 4.4 inches, which lets one size grip most 12-, 16-, and 20-ounce paper hot cups and many 16- to 24-ounce clear cold cups. That single size is convenient, but it has a real limit: sleeves cut for the 12-to-20 band frequently will not stay on an 8-ounce cup, because the cup’s taper is too narrow for the band to bite. If short cups are part of your program, plan on a second size rather than forcing one sleeve to do everything.
Height matters as much as circumference. A taller band covers more of the cup and gives you more print area, but it also creeps toward the lid and the hand position. If your design leans on a logo that needs to sit upright and centered, confirm the print area on the flattened dieline before you commit, because the usable window is smaller than the full board once you subtract the glue seam and the curve of the wrap.
Pick the print method by your order size
The largest single swing in what a sleeve costs is not the artwork; it is whether the job runs digitally or on a flexographic press, and the break point is driven almost entirely by quantity. Digital printing carries no plate cost, so it stays cheap on short runs and is usually the right call below roughly 2,000 pieces. Flexo adds a one-time plate charge but then prints each unit for less, so it pulls ahead once volume climbs past about 5,000. Between those two numbers the answer depends on how many colors you run and the exact material.
The per-unit picture below shows the pattern. At 250 to 1,000 pieces digital is level or cheaper; by 5,000 and 10,000 flexo has clearly taken over. The figures are indicative industry ranges rather than a specific quote, and your real numbers will move with stock, color count, and finishing, but the shape of the curve holds across suppliers.
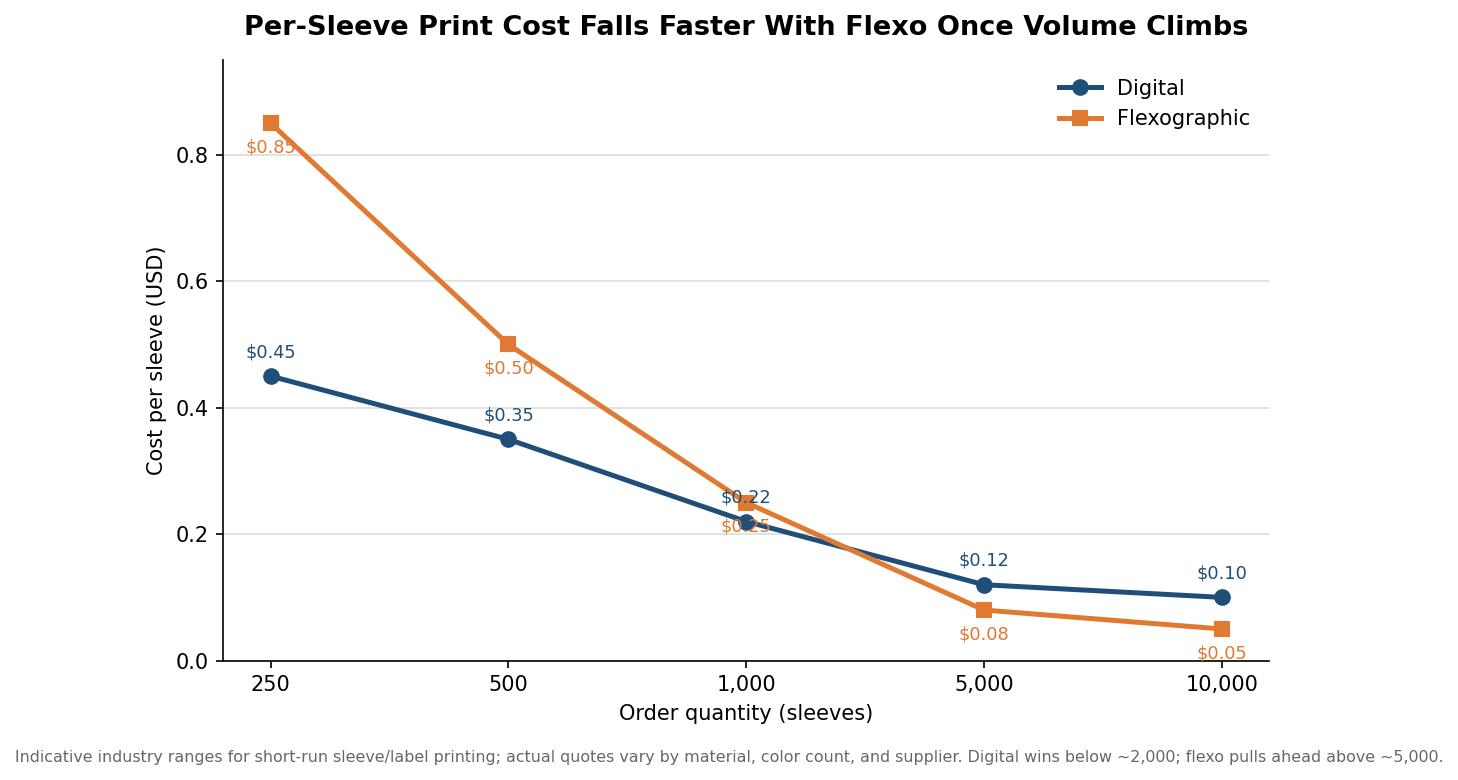
Two practical consequences follow. First, if you are testing a design or running a one-time event, do not let a printer talk you onto a press that needs 5,000 units to make sense; a digital short run exists precisely so you can order 500 without paying for plates you will never reuse. Second, if you know you will reorder the same art several times a year, the plate you pay for once on a flexo job amortizes across every future run, which changes the math in flexo’s favor even at moderate volumes.
Design for kraft, and mind the white
Most sleeves are printed on natural kraft or corrugated board, and that brown substrate imposes one rule that surprises first-time buyers: white usually cannot be printed. On kraft there is no white ink laydown on many sleeve lines, so any part of your art you imagined as white will simply show the brown board instead. If your logo depends on white type or a white knockout, you have three options: switch to a bleached white sleeve stock, redesign so the brown board becomes the light element, or accept that the “white” areas read as kraft. Decide this at the design stage, not at the proof, because it reshapes the whole layout.
Color count also drives the flexo plate cost, which climbs with every additional ink. Plates commonly run on the order of $50 to $200 per color, so a two-color mark is far cheaper to tool than a six-color illustration. The chart below shows how the upfront plate and setup cost stacks up as colors are added; digital, by contrast, charges nothing for plates, which is another reason full-color photographic art tends to favor digital on shorter runs.
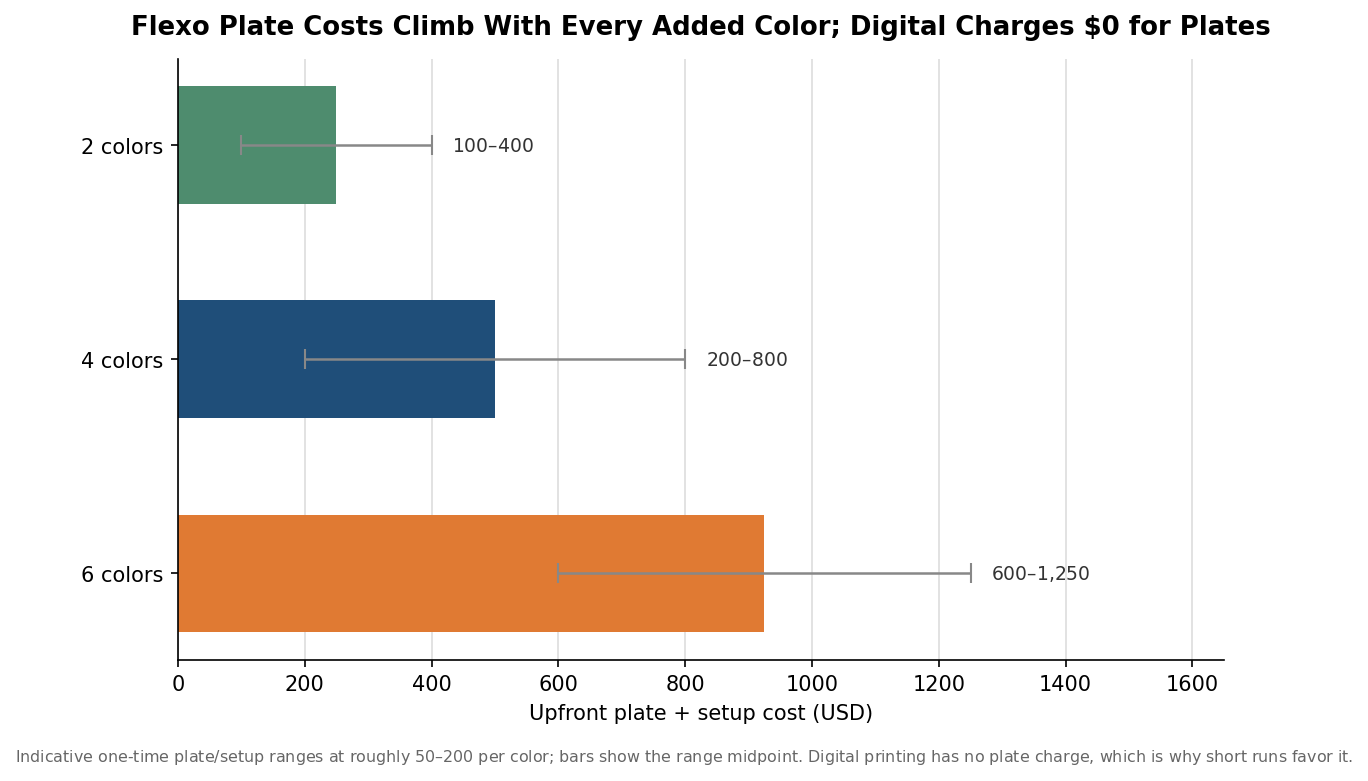
A tight, two- or three-color design is not just cheaper; it is also more forgiving on an absorbent kraft surface, where fine gradients and small reversed type can fill in. Bold shapes and solid spot colors reproduce more reliably than delicate detail.
Build a print-ready file
Suppliers vary in their exact preflight requirements, and the honest answer is that bleed, resolution, and color targets are ultimately set by the approved dieline and the press, not by one universal number. That said, a few conventions travel well. Set up your artwork on the supplier’s flattened dieline and extend every background to the bleed boundary, typically around an eighth of an inch past the trim, so a slight shift on the die does not leave a white sliver. Keep logos and text inside the marked safe area, well clear of the glue seam where the wrap overlaps. Build raster images to roughly 300 dpi at final printed size, and remember that scaling a placed image up in the layout lowers its effective resolution even if the original file looked sharp.
Supply artwork as editable vector wherever possible, an Illustrator, EPS, or press-ready PDF, and label which objects are process CMYK and which are Pantone spot colors so the printer matches your brand ink rather than guessing at a build. Always send a reference PDF alongside the source so the shop can confirm the file matches what you approved. These file habits are what separate a job that clears preflight on the first pass from one that bounces back with queries and adds days to the schedule.
Confirm quantity, proof, and lead time before you sign off
Sleeves are ordered by the case, and minimums are real: a single case commonly holds about 1,000 pieces, and volume discounts typically start at three or more cases, so ordering just over a case boundary can be poor value. Ask for a one-time setup fee figure up front; on corrugated stock it is often around $50 per artwork, separate from the plate costs on a flexo job. Build the calendar around production, too. Corrugated custom sleeves commonly carry a lead time near three weeks, with rush options sometimes landing in the 10-to-14 business-day range when a printer approves them, so an event four weeks out has little slack once art revisions are counted.
The last safeguard is the proof. Approve a physical or high-resolution digital proof against the actual sleeve size and stock, checking that the design clears the seam, that any intended white is handled, and that spot colors are called out by number. A sleeve you specify carefully once becomes a template you can reorder for years; the effort you spend getting the dimensions, print method, and file right on the first order is what keeps every reorder fast, predictable, and on brand.
Leave a Reply